
Introduction
Within this article we will be exploring the world of Ansible and how it can be used to automate the network. We will start with automating the provisioning of an L3 spine and leaf fabric. Once complete we will then automate the connectivity testing across the fabric.
Let's go...
Topology
The topology of the network we will be automating is shown below.
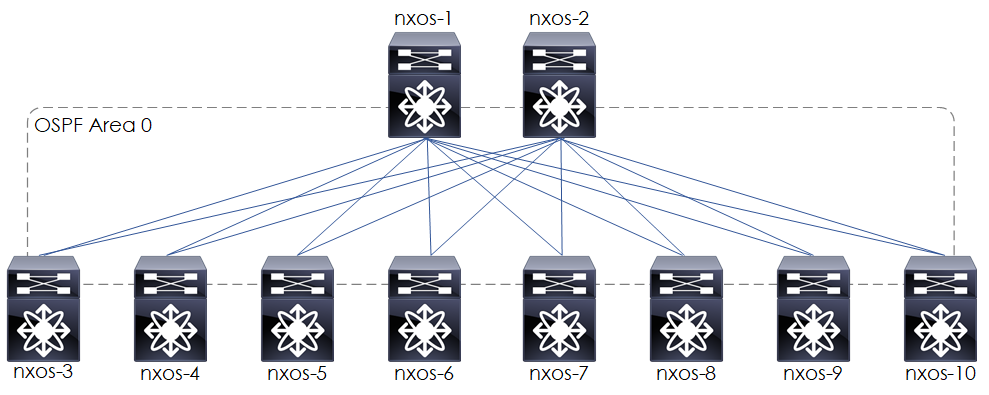
Figure 1 - Topology.
At a high level our topology will be configured based upon the following:
- Spine and leaf.
- OSPF L3 based fabric.
- OSPF single area.
- OSPF interface set to the point to point network type.
- MTU 9216 upon all links.
- IP unnumbered interfaces upon all links, set to use the IP of Lo0.
Configurations
Based on these points the configuration that we will apply, is shown below:
Spine
feature ospf

interface Ethernet1/1-2
  no switchport
  mtu 9216
  medium p2p
  ip unnumbered loopback0
  ip router ospf 1 area 0.0.0.0
  no shutdown

interface loopback0
  description Loopback
  ip address 192.168.1.x/32
  ip router ospf 1 area 0.0.0.0
  no shutdown

router ospf 1
Leaf
feature ospf

interface loopback0
  description Loopback
  ip address 192.168.1.x/32
  ip router ospf 1 area 0.0.0.0
  no shutdown

interface Ethernet2/1-8
  no switchport
  mtu 9216
  medium p2p
  ip unnumbered loopback0
  ip router ospf 1 area 0.0.0.0
  no shutdown

router ospf 1
What is Ansible?
Ansible is open source software that automates software provisioning, configuration management, and application deployment[1], based upon an agentless architecture. Hosts are managed by an Ansible control machine via SSH.
When it comes to network automation Ansible supports a large range of vendors ; https://docs.ansible.com/ansible/2.8/modules/list_of_network_modules.html.
Ansible Components
Ansible consists of a number of components. Below details the main ones:
- Controller Machine: This is where Ansible is installed and from where the hosts and managed via SSH.
- Inventory: Contains each of the hosts that are to be managed.
- Playbook: Simple files written in YAML that describe actions that we want to be performed. These actions are constructed based on the following hierarchy:
- Play: Contains a set of tasks.
- Task: Contains a set of modules.
- Module: Modules control system resources, like services, packages, files, or execute system commands.
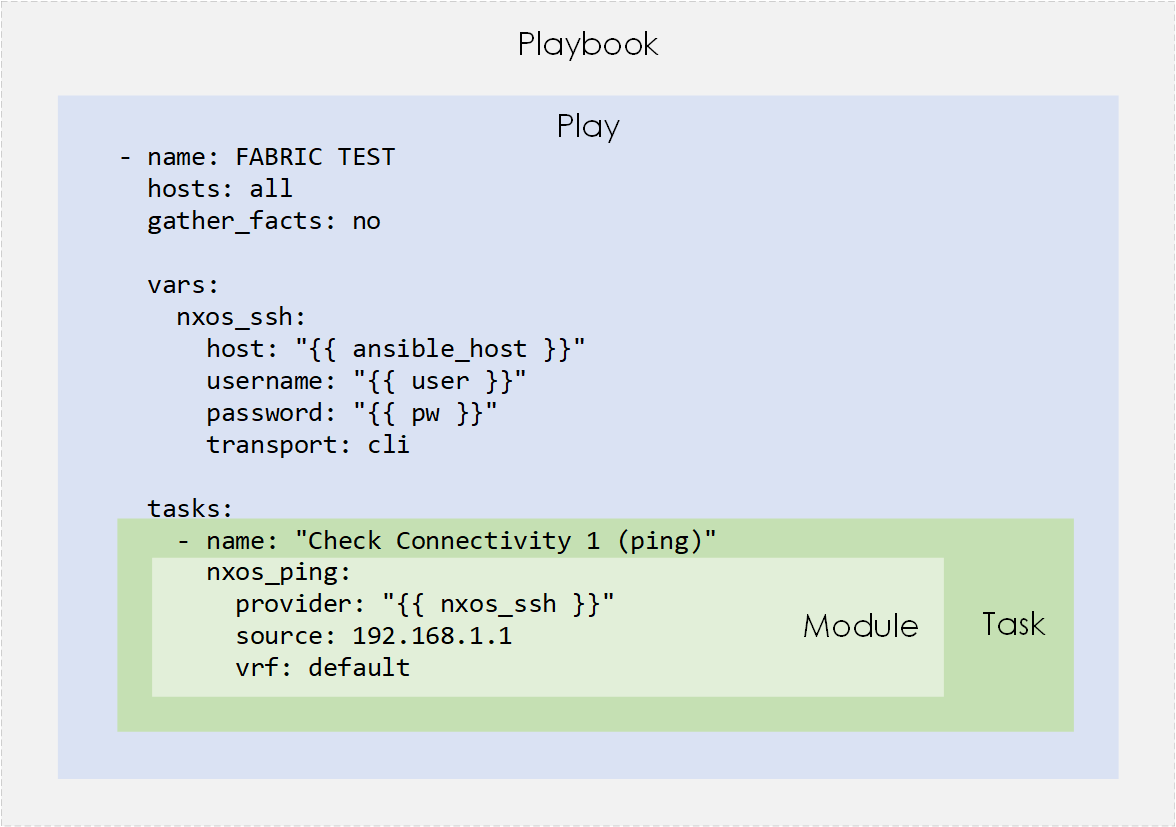
Figure 2 - Ansible Playbook Components.
Install Ansible
The process of installing Ansible is pretty straightforward. A couple of apt-get commands, and we are ready to go.
sudo apt-get update
sudo apt-get install software-properties-common
sudo apt-add-repository ppa:ansible/ansible
sudo apt-get update

sudo apt-get install -y ansible

sudo mkdir -p ~/development/ansible
Create Ansible Config File
Next, create a custom Ansible config file. Within this config file we will:
- set the location of our inventory file.
- disable host key checking (not recommended for production).
- set the SSH timeout.
sudo cd ~/development/ansible
cat > ansible.cfg
[defaults]
Inventory = ./hosts
Host_key_checking = false
Timeout = 5
Create Inventory
Inventory files contain a list of hosts that are manageable by Ansible. Within this file, we can group our hosts, assign additional variables to the hosts, and also assign general variables, all of which can then be referenced within our playbooks, shown in the later sections.
[all:vars]
ansible_connection = local
user = cisco
pw = cisco

[spine]
spine-nxos-1 ansible_host=172.29.132.201 lo0_ipaddr=192.168.1.1 eth_range_end=8
spine-nxos-2 ansible_host=172.29.132.202 lo0_ipaddr=192.168.1.2 eth_range_end=8

[leaf]
leaf-nxos-3 ansible_host=172.29.132.203 lo0_ipaddr=192.168.1.3 eth_range_end=2
leaf-nxos-4 ansible_host=172.29.132.204 lo0_ipaddr=192.168.1.4 eth_range_end=2
leaf-nxos-5 ansible_host=172.29.132.205 lo0_ipaddr=192.168.1.5 eth_range_end=2
leaf-nxos-6 ansible_host=172.29.132.206 lo0_ipaddr=192.168.1.6 eth_range_end=2
leaf-nxos-7 ansible_host=172.29.132.207 lo0_ipaddr=192.168.1.7 eth_range_end=2
leaf-nxos-8 ansible_host=172.29.132.208 lo0_ipaddr=192.168.1.8 eth_range_end=2
leaf-nxos-9 ansible_host=172.29.132.209 lo0_ipaddr=192.168.1.9 eth_range_end=2
leaf-nxos-10 ansible_host=172.29.132.210 lo0_ipaddr=192.168.1.10 eth_range_end=2
Create Playbook
Now we will build our playbooks. A playbook (at a high level) is a collection of tasks (aka actions) that we want to perform upon the hosts defined within our inventory file.
We will create 2 playbooks - fabric_build.yml and fabric_test.yml. Each will be placed into a directory named playbooks (created below).
mkdir -p ~/ansible/playbooks
Each playbook will contain a play (FABRIC BUILD or FABRIC TEST). Within the play we will set the SSH connection variables (under 'nxos_ssh') and then set various tasks. Each task will reference an ansible module that will perform the required configuration action.
Fabric Build Playbook
---
- name: FABRIC BUILD
  hosts: all
  gather_facts: no

  vars:
    nxos_ssh:
      host: "{{ ansible_host }}"
      username: "{{ user }}"
      password: "{{ pw }}"
      transport: cli

  tasks:
    - name: "Set lo0"
      nxos_interface:
        provider: "{{ nxos_ssh }}"
        name: Loopback 0
        state: present

    - name: "Set lo0 ip"
      nxos_l3_interface:
        provider: "{{ nxos_ssh }}"
        name: Loopback 0
        ipv4: "{{ hostvars[inventory_hostname]['lo0_ipaddr'] }}/32"
        state: present

    - name: "Set ethernet ports to jumbo"
      nxos_interface:
        provider: "{{ nxos_ssh }}"
        name: "ethernet 2/{{item}}"
        state: present
        mode: layer3
        mtu: 9216
      with_sequence: start=1 end="{{ hostvars[inventory_hostname]['eth_range_end'] }}"

    - name: "Set ethernet ports to p2p and unnumbered"
      nxos_config:
        provider: "{{ nxos_ssh }}"
        lines:
          - medium p2p
          - ip unnumbered lo0
        before:
          - "interface ethernet 2/{{item}}"
      with_sequence: start=1 end="{{ hostvars[inventory_hostname]['eth_range_end'] }}"

    - name: "Enable OSPF feature"
      nxos_feature:
        provider: "{{ nxos_ssh }}"
        feature: ospf
        state: enabled

    - name: "Create OSPF router instance"
      nxos_ospf:
        provider: "{{ nxos_ssh }}"
        ospf: 1
        state: present

    - name: "Enable interface OSPF (eth)"
      nxos_interface_ospf:
        provider: "{{ nxos_ssh }}"
        interface: "ethernet 2/{{item}}"
        ospf: 1
        area: 0
      with_sequence: start=1 end="{{ hostvars[inventory_hostname]['eth_range_end'] }}"

    - name: "Enable interface OSPF (lo0)"
      nxos_interface_ospf:
        provider: "{{ nxos_ssh }}"
        interface: lo0
        ospf: 1
        area: 0
Fabric Test Playbook
- name: FABRIC TEST
  hosts: all
  gather_facts: no

  vars:
    nxos_ssh:
      host: "{{ ansible_host }}"
      username: "{{ user }}"
      password: "{{ pw }}"
      transport: cli

  tasks:
    - name: "Check Connectivity (ping)"
      nxos_ping:
        provider: "{{ nxos_ssh }}"
        source: "{{ hostvars[inventory_hostname]['lo0_ipaddr'] }}"
        vrf: default
        dest: "192.168.1.{{item}}"
      with_sequence: start=1 end=10
      register: out

    - debug:
        msg:
          - "command: {{ out.results[item|int].commands[0]}}"
          - "rtt: {{ out.results[item|int].rtt}}"
          - "pktloss: {{ out.results[item|int].packet_loss}}"
      with_sequence: start=0 end=9
With these 2 files created, you should now have a directory layout, much like this:
.
├── ansible.cfg
├── hosts
└── playbooks
    ├── fabric_build.yml
    └── fabric_test.yml
Deploy
With everything in place, we can now look to deploy. This is by far the best part of the whole process!
Pre-Check
Before we begin let's have a quick look upon one of the devices and check the configuration. As you see below, we have no OSPF configured, and there is no connectivity.
nx-osv-1# show ip ospf
Note:  process currently not running
nx-osv-1# show ip ospf neighbors
Note:  process currently not running
nx-osv-1(config)# show ip route
IP Route Table for VRF "default"
'*' denotes best ucast next-hop
'**' denotes best mcast next-hop
'[x/y]' denotes [preference/metric]
'%<string>' in via output denotes VRF <string>

192.168.1.1/32, ubest/mbest: 2/0, attached
    *via 192.168.1.1, Lo0, [0/0], 2d00h, local
    *via 192.168.1.1, Lo0, [0/0], 2d00h, direct
nx-osv-1# ping 192.168.1.2
PING 192.168.1.2 (192.168.1.2): 56 data bytes
ping: sendto 192.168.1.2 64 chars, No route to host
Request 0 timed out
ping: sendto 192.168.1.2 64 chars, No route to host
Request 1 timed out
Run Playbooks
To deploy our fabric we start with our first playbook - fabric_build.yml. Like so:
rick@desktop:~/development/ansible$ ansible-playbook playbooks/fabric_build.yml

PLAY [FABRIC BUILD] ****************************************************************************************************************

TASK [Set lo0] *********************************************************************************************************************
changed: [leaf-nxos-4]
changed: [leaf-nxos-5]
changed: [spine-nxos-2]
changed: [leaf-nxos-3]
changed: [spine-nxos-1]
changed: [leaf-nxos-6]
changed: [leaf-nxos-8]
changed: [leaf-nxos-7]
changed: [leaf-nxos-9]
changed: [leaf-nxos-10]

TASK [Set lo0 ip] ******************************************************************************************************************
changed: [leaf-nxos-3]
changed: [spine-nxos-2]
changed: [spine-nxos-1]
changed: [leaf-nxos-4]
changed: [leaf-nxos-5]
changed: [leaf-nxos-7]
changed: [leaf-nxos-6]
changed: [leaf-nxos-9]
changed: [leaf-nxos-10]
changed: [leaf-nxos-8]

TASK [Set ethernet ports to jumbo] *************************************************************************************************
changed: [spine-nxos-2] => (item=1)
changed: [spine-nxos-1] => (item=1)
changed: [leaf-nxos-4] => (item=1)
changed: [leaf-nxos-5] => (item=1)
changed: [leaf-nxos-3] => (item=1)
changed: [leaf-nxos-3] => (item=2)
....

PLAY RECAP *************************************************************************************************************************
leaf-nxos-10               : ok=8    changed=7    unreachable=0    failed=0
leaf-nxos-3                : ok=8    changed=7    unreachable=0    failed=0
leaf-nxos-4                : ok=8    changed=7    unreachable=0    failed=0
leaf-nxos-5                : ok=8    changed=7    unreachable=0    failed=0
leaf-nxos-6                : ok=8    changed=7    unreachable=0    failed=0
leaf-nxos-7                : ok=8    changed=7    unreachable=0    failed=0
leaf-nxos-8                : ok=8    changed=7    unreachable=0    failed=0
leaf-nxos-9                : ok=8    changed=7    unreachable=0    failed=0
spine-nxos-1               : ok=8    changed=7    unreachable=0    failed=0
spine-nxos-2               : ok=8    changed=7    unreachable=0    failed=0
Our playbook run was successful, which we can see based on the failed=0 counts.
Now our build is complete the fabric_test.yml can be run to test connectivity.
rick@desktop:~/development/ansible$ ansible-playbook playbooks/fabric_test.yml

PLAY [FABRIC TEST] *****************************************************************************************************************
TASK [Check Connectivity (ping)] ***************************************************************************************************
ok: [spine-nxos-1] => (item=1)
ok: [leaf-nxos-5] => (item=1)
ok: [spine-nxos-2] => (item=1)
ok: [leaf-nxos-3] => (item=1)
ok: [leaf-nxos-4] => (item=1)
ok: [leaf-nxos-5] => (item=2)
ok: [spine-nxos-1] => (item=2)
ok: [spine-nxos-2] => (item=2)
ok: [leaf-nxos-5] => (item=3)
ok: [leaf-nxos-3] => (item=2)
ok: [spine-nxos-2] => (item=3)
....

TASK [debug] ***********************************************************************************************************************
ok: [spine-nxos-1] => (item=0) => {
    "msg": [
        "command: ping 192.168.1.1 count 5 source 192.168.1.1 vrf default",
        "rtt: {u'max': 0.187, u'avg': 0.153, u'min': 0.124}",
        "pktloss: 0.00%"
    ]
}
ok: [spine-nxos-1] => (item=1) => {
    "msg": [
        "command: ping 192.168.1.2 count 5 source 192.168.1.1 vrf default",
        "rtt: {u'max': 5.614, u'avg': 4.626, u'min': 3.828}",
        "pktloss: 0.00%"
    ]
}
ok: [spine-nxos-2] => (item=0) => {
    "msg": [
        "command: ping 192.168.1.1 count 5 source 192.168.1.2 vrf default",
        "rtt: {u'max': 4.846, u'avg': 4.173, u'min': 3.724}",
        "pktloss: 0.00%"
    ]
}

…

PLAY RECAP *************************************************************************************************************************
leaf-nxos-10               : ok=2    changed=0    unreachable=0    failed=0
leaf-nxos-3                : ok=2    changed=0    unreachable=0    failed=0
leaf-nxos-4                : ok=2    changed=0    unreachable=0    failed=0
leaf-nxos-5                : ok=2    changed=0    unreachable=0    failed=0
leaf-nxos-6                : ok=2    changed=0    unreachable=0    failed=0
leaf-nxos-7                : ok=2    changed=0    unreachable=0    failed=0
leaf-nxos-8                : ok=2    changed=0    unreachable=0    failed=0
leaf-nxos-9                : ok=2    changed=0    unreachable=0    failed=0
spine-nxos-1               : ok=2    changed=0    unreachable=0    failed=0
spine-nxos-2               : ok=2    changed=0    unreachable=0    failed=0
Great, success! We now have an up and running L3 fabric with connectivity.
Note: There is a small caveat with our test playbook. Due to using unnumbered interfaces, and due to ECMP, connectivity will still pass even if a single interface is down. Therefore we will only see errors in the event of an entire switch (i.e both spine uplinks) being down. However, for the scope of this document, this test provides adequate testing.
Validate
Finally we can recheck the spine - as a matter of belt and braces - checking the OSPF process, neighbors and RIB.
nx-osv-1# show ip ospf | inc Proc
 Routing Process 1 with ID 192.168.1.1 VRF default
 Routing Process Instance Number 1
nx-osv-1# show ip ospf neighbors
 OSPF Process ID 1 VRF default
 Total number of neighbors: 8
 Neighbor ID     Pri State            Up Time  Address         Interface
 192.168.1.3       1 FULL/ -          00:47:28 192.168.1.3     Eth2/1
 192.168.1.4       1 FULL/ -          00:47:29 192.168.1.4     Eth2/2
 192.168.1.5       1 FULL/ -          00:47:29 192.168.1.5     Eth2/3
 192.168.1.6       1 FULL/ -          00:47:20 192.168.1.6     Eth2/4
 192.168.1.7       1 FULL/ -          00:47:16 192.168.1.7     Eth2/5
 192.168.1.8       1 FULL/ -          00:47:17 192.168.1.8     Eth2/6
 192.168.1.9       1 FULL/ -          00:47:11 192.168.1.9     Eth2/7
 192.168.1.10      1 FULL/ -          00:47:10 192.168.1.10    Eth2/8
nx-osv-1# show ip route ospf
192.168.1.2/32, ubest/mbest: 8/0
    *via 192.168.1.3, Eth2/1, [110/81], 00:47:10, ospf-1, intra
    *via 192.168.1.4, Eth2/2, [110/81], 00:47:10, ospf-1, intra
    *via 192.168.1.5, Eth2/3, [110/81], 00:47:10, ospf-1, intra
    *via 192.168.1.6, Eth2/4, [110/81], 00:47:10, ospf-1, intra
    *via 192.168.1.7, Eth2/5, [110/81], 00:47:10, ospf-1, intra
    *via 192.168.1.8, Eth2/6, [110/81], 00:47:10, ospf-1, intra
    *via 192.168.1.9, Eth2/7, [110/81], 00:47:10, ospf-1, intra
    *via 192.168.1.10, Eth2/8, [110/81], 00:47:10, ospf-1, intra
192.168.1.3/32, ubest/mbest: 1/0
    *via 192.168.1.3, Eth2/1, [110/41], 00:47:16, ospf-1, intra
     via 192.168.1.3, Eth2/1, [250/0], 00:44:38, am
192.168.1.4/32, ubest/mbest: 1/0
    *via 192.168.1.4, Eth2/2, [110/41], 00:47:16, ospf-1, intra
     via 192.168.1.4, Eth2/2, [250/0], 00:44:38, am
192.168.1.5/32, ubest/mbest: 1/0
    *via 192.168.1.5, Eth2/3, [110/41], 00:47:10, ospf-1, intra
     via 192.168.1.5, Eth2/3, [250/0], 00:46:39, am
192.168.1.6/32, ubest/mbest: 1/0
    *via 192.168.1.6, Eth2/4, [110/41], 00:47:10, ospf-1, intra
     via 192.168.1.6, Eth2/4, [250/0], 00:44:19, am
192.168.1.7/32, ubest/mbest: 1/0
    *via 192.168.1.7, Eth2/5, [110/41], 00:47:10, ospf-1, intra
     via 192.168.1.7, Eth2/5, [250/0], 00:46:45, am
192.168.1.8/32, ubest/mbest: 1/0
    *via 192.168.1.8, Eth2/6, [110/41], 00:47:10, ospf-1, intra
     via 192.168.1.8, Eth2/6, [250/0], 00:44:10, am
...
PING 192.168.1.2 (192.168.1.2): 56 data bytes
64 bytes from 192.168.1.2: icmp_seq=0 ttl=253 time=14.418 ms
64 bytes from 192.168.1.2: icmp_seq=1 ttl=253 time=5.082 ms
64 bytes from 192.168.1.2: icmp_seq=2 ttl=253 time=7.045 ms
64 bytes from 192.168.1.2: icmp_seq=3 ttl=253 time=5.83 ms
nx-osv-1# traceroute 192.168.1.2
traceroute to 192.168.1.2 (192.168.1.2), 30 hops max, 40 byte packets
 1  192.168.1.7 (192.168.1.7)  2.819 ms  1.369 ms  1.532 ms
 2  192.168.1.2 (192.168.1.2)  3.721 ms  3.286 ms  3.203 ms
Outro
That concludes our tutorial on how to build a spine and leaf fabric with Ansible.
As you can see Ansible provides a great deal of power and flexibility when automating the network, and is a great tool to have within the armoury of any "modern day" network engineer.
References
"Ansible (software) - Wikipedia." https://en.wikipedia.org/wiki/Ansible_(software). Accessed 27 Nov. 2018. ↩︎