Introduction
Welcome to this 3 part course on installing a virtualized Nuage VCS (DC-SDN) lab.
The series will be broken down into the following parts:
- Part1: VSD Installation (Management Plane)
- Part2: VSC Installation (Control Plane)
- Part3: VRS Installation (DataPlane)
Note: The VSP version we will be installing will be 5.3.2.
What is Nuage VCS?
Virtualized Cloud Services (VCS) is a datacenter based SDN platform provided by Nuage Networks. VCS provides an overlay solution to interconnect bare metal assets and virtual machines together within your network, via an overlay. The VSC platform is built upon the following components:
- VSD (Management Plane)
- VSC (Control Plane)
- VRS (Data Plane)
Below shows an overview of a VCS and each plane.
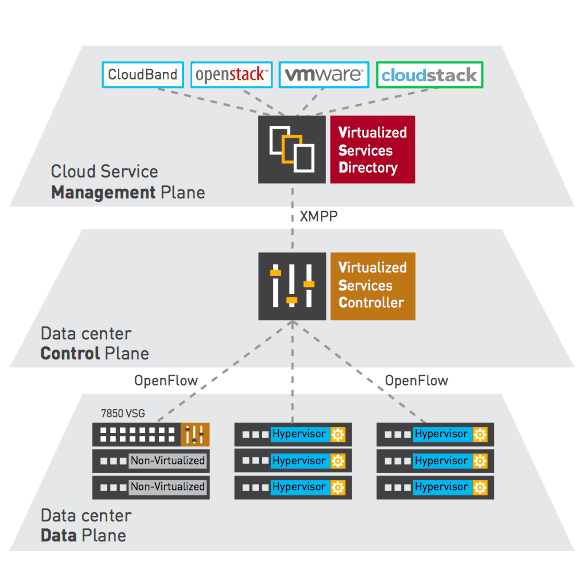
Figure 1: VCS - Highlevel
Lab Details/Prep
Topology
Below outlines our lab topology. We will use:
- 1 x OpenStack Controller.
- 1 x OpenStack Compute.
- 1 x Nuage VSC (Controller).
- 1 x Nuage VSD (Manager).
- 1 x DNS Server (How to Configure a Bind Server)
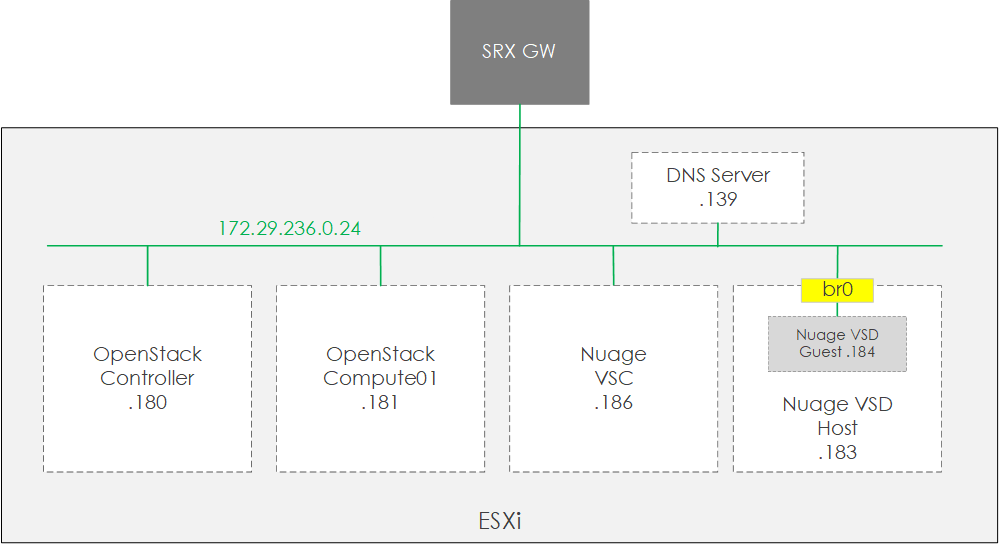
Figure 2: Lab Topology
Virtual Machines
With regards to the VMs that we will use in our lab, please see below:
| Device | Hostname | IP | vCPU | RAM | Disk |
| PackStack Controller | packstack-controller | 172.29.236.180 | 2 | 16GB | 40GB |
| PackStack Compute | packstack-compute | 172.29.236.181 | 2 | 16GB | 40GB |
| Nuage VSD Host | vsd | 172.29.236.183 | 6 | 24GB | 40GB |
| Nuage VSD Guest | packstack-vsd | 172.29.236.184 | -- | -- | -- |
| Nuage VSC | vsc | 172.19.236.186 | 4 | 4GB | 1GB |
Prereq
Before beginning the following must be completed:
- DNS - The following DNS entries configured:
- A Name -
vsd.lab.localto172.29.236.184 - PRT -
172.29.236.184tovsd.lab.local
- A Name -
- OpenStack - OpenStack deployed based upon the steps provided here.
Deploy VSD
The steps to build VSD will involve creating a VM. Upon the VM we will then install another VM. Which will then run the VSD software.
Build VSD Host VM
In order to build the host VM follow these steps:
- Build a CentOS7 VM.
- Configure the interfaces (aka create bridge0) based upon the following. Note: The VM will be attached to
bridge0for network connectivity.
/etc/sysconfig/network-scripts/ifcfg-br0
DEVICE=bridge0
TYPE=Bridge
ONBOOT=yes
IPADDR=172.29.236.183
MASK=24
GATEWAY=172.29.236.1

/etc/sysconfig/network-scripts/ifcfg-ens192
TYPE=Ethernet
BOOTPROTO=none
DEFROUTE=yes
IPV4_FAILURE_FATAL=yes
NAME=ens192
DEVICE=ens192
BRIDGE=bridge0
ONBOOT=yes
- Run the following commands
yum update -y ; yum install virt-install -y - Copy the VSD qcow2 to
/root/<file_name>.qcow2
Deploy VSD VM
Start the VM via the command:
virt-install --connect qemu:///system -n vsd -r 24576 --os-type=linux
--os-variant=rhel7 --disk path=/root/<file_name>.qcow2
,device=disk,bus=virtio,format=qcow2
--vcpus=6 --graphics vnc,listen=0.0.0.0 --noautoconsole --import
Confirm the VSD guest VM is running, via virsh list --all.
Install VSD
Prepare VM
-
Connect to the VM via
virsh console vsd. Creds root/Alcateldc. -
Configure eth0 using the following settings:
[root@vsd ~]# cat /etc/sysconfig/network-scripts/ifcfg-eth0 DEVICE=eth0 NM_CONTROLLED=no ONBOOT=yes TYPE=Ethernet BOOTPROTO=static NETMASK=255.255.255.0 IPADDR=172.29.236.184 GATEWAY=172.29.236.1 -
Then
/etc/init.d/network restart -
Set the hostname via
echo vsd.lab.local > /etc/hostname -
Add an entry to hosts via
echo "172.29.236.184 vsd.lab.local" >> /etc/hosts -
Reboot and reconnect via SSH.
-
Configure time/NTP via,
mv /etc/localtime /root/localtime.old service ntpd stop ntpdate -u 8.8.4.4 service ntpd start chkconfig ntpdate on -
Check NTP is sync'd via
ntpstat -
Run a system update via
yum update -
Check DNS (A and PTR records) via the command
/opt/vsd/install/checkDNS.sh -a vsd.lab.local -1 -v 4
Install
- Run the install script
/opt/vsd/vsd-install.shand select standalone.
[root@vsd ~]# /opt/vsd/vsd-install.sh
-------------------------------------------------------------
  V I R T U A L I Z E D  S E R V I C E S  D I R E C T O R Y
  version 5.3.1_10
(c) 2018 Nuage Networks
-------------------------------------------------------------
VSD supports these configurations:
1)  HA, consisting of 3 redundant installs of VSD.
2)  Standalone, where all services are installed on a single machine.
3)  VCIN only.
Is this a redundant (r), standalone (s), or vcin (v) installation? (default=s): s
Deploy VSD on single host vsd.lab.local  ...
VSD node:      vsd.lab.local
Continue (with VSD generated root ca) [y|n]? (default=y): y
Starting VSD deployment . This may take as long as 20 minutes in some situations ...
VSD package deployment and configuration DONE. Please initialize VSD.
Starting VSD initialization . This may take as long as 20 minutes in some situations ...
A self-signed certificate has been generated to get you started using VSD.
crontab entry for vsd nohup log rotation already configured
VSD installed and the services have started.
- Once installed watch monit to ensure services are up, via the command
monit summary
[root@vsd ~]# monit summary
The Monit daemon 5.17.1 uptime: 14m
Process 'zookeeper'                 Running
Program 'zookeeper-status'          Status ok
File 'jboss-console-log'            Accessible
File 'mediator-out'                 Accessible
Program 'vsd-core-status'           Status ok
File 'monit-log'                    Accessible
File 'zookeeper-out'                Accessible
File 'vsd-syslog'                   Accessible
Program 'vsd-common-status'         Status ok
Filesystem 'rootfs'                 Accessible
Program 'ntp-status'                Status ok
Process 'mysql'                     Running
Program 'mysql-status'              Status ok
Process 'mediator'                  Running
Program 'mediator-status'           Status ok
Program 'keyserver-status'          Status ok
Process 'jboss'                     Running
Program 'jboss-status'              Status ok
Process 'infinispan'                Running
Program 'infinispan-status'         Status ok
Program 'ejbca-status'              Status ok
Process 'ejabberd'                  Running
Program 'ejabberd-status'           Status ok
Process 'activemq'                  Running
Program 'activemq-status'           Status ok
System 'vsd.lab.local'              Running
Post Tasks
The final post tasks are,
- Remove services
systemctl disable cloud-init
systemctl disable cloud-init-local
systemctl disable cloud-config
systemctl disable cloud-final
- Add your license by going to https://vsd.lab.local:8443/ and entering the credentials csproot/csproot with an org of csp. From within the UI, add your license file.
Now the VSD is complete, we will move onto the installation of the controller (VSC)...