How to View the Network Namespaces in Kubernetes
Scroll Down
Introduction
Namespaces are one of the main aspects used by containers (see image below[1]). They provide a form of isolation, allowing containers to remain portable and separate from the host system. Though various types of namespaces are provided by the Linux Kernel, for the context of this article our scope will be the network namespace.
Within this article, we will look at how to view the network namespaces within a Kubernetes cluster, which can be extremely useful for troubleshooting and learning purposes.
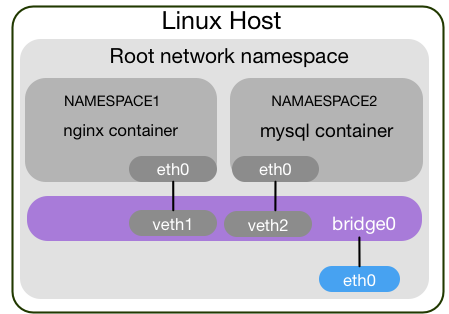
Figure 1 - Container namespaces
Traditional Method (ip netns)
Traditionally, network namespaces can be viewed via the command ip netns list.
Like so (OpenStack example is shown),
root@controller01:~# ip netns list
qrouter-e945b6b1-54be-49ef-95ed-5d524d2f3616
qdhcp-dae14f7d-c7f9-4dbc-9635-603f0fbc3f09
However, on a Kubernetes node you will find that this command returns no results.
This is actually due to Docker. As Platform9 clearly states,
By default docker does not add container network namespaces to the linux runtime data (/var/run mounted as a tmpfs from /run) which is what you see when you run the ip netns command.
Ok, so how do we view the network namespaces? The answer is nsenter.
Steps
Below we will show the various steps required to view a network namespace on a Kube node.
Get Container ID
First, we get the container id by running the command,
docker ps
Get Container PID
Next we get the container pid by running the following command,
docker inspect --format '{{ .State.Pid }}' <CONTAINER_ID>
Run Command in Namespace
Now we have the container PID we can run a command from within the network namespace, such as ip addr.
# nsenter -t <CONTAINER_PID> -n ip addr
1: lo: <LOOPBACK,UP,LOWER_UP> mtu 65536 qdisc noqueue state UNKNOWN group default qlen 1000
    link/loopback 00:00:00:00:00:00 brd 00:00:00:00:00:00
    inet 127.0.0.1/8 scope host lo
       valid_lft forever preferred_lft forever
    inet6 ::1/128 scope host
       valid_lft forever preferred_lft forever
16: eth0@if17: <BROADCAST,MULTICAST,UP,LOWER_UP> mtu 1376 qdisc noqueue state UP group default
    link/ether 7e:3f:92:07:69:57 brd ff:ff:ff:ff:ff:ff link-netnsid 0
    inet 10.47.0.5/12 brd 10.47.255.255 scope global eth0
       valid_lft forever preferred_lft forever
    inet6 fe80::7c3f:92ff:fe07:6957/64 scope link
       valid_lft forever preferred_lft forever
Mapping the veth Pair
In order to map the veth on the host back to the interface from within the interface, we need to perform the following steps.
Get Link ID
Obtain the number after the eth name from within the namespace, for the interface in question. Based on our previous ip addr output, this would be @if17.
Lookup up the Link ID
On the host find the id of the link via ip link. Like so,
# ip link | grep -A1 ^17
17: vethweplb3f36a0@if16: <BROADCAST,MULTICAST,UP,LOWER_UP> mtu 1376 qdisc noqueue master weave state UP mode DEFAULT group default
    link/ether 72:1c:73:d9:d9:f6 brd ff:ff:ff:ff:ff:ff link-netnsid 1
From this we can now conclude that vethweplb3f36a0 upon the host is mapped to the interface eth0@if17 within our namespace.
References
"Network Engineer in DevOps world." http://logingood.github.io/. Accessed 18 Apr. 2019. ↩︎