Introduction
In the 1st part of this series we manipulated containers from the command line, and while that is useful editors and IDEs provide integration of application development with docker. In this section, I will show how to use Visual Studio Code and its Docker integration for Python development.
You will need the Remote - Containers extension and preferably the Docker extension to manage your images and containers. This lets you use a Docker container as a full-featured development environment since it allows you to open any folder inside (or mounted into) a container and take advantage of Visual Studio Code features.
Great, let's go...
Attaching to an Existing Container
Following on from the previous examples and the container that we previously built and ran, we need to open a new VSCode window and select the docker extension. Like so:
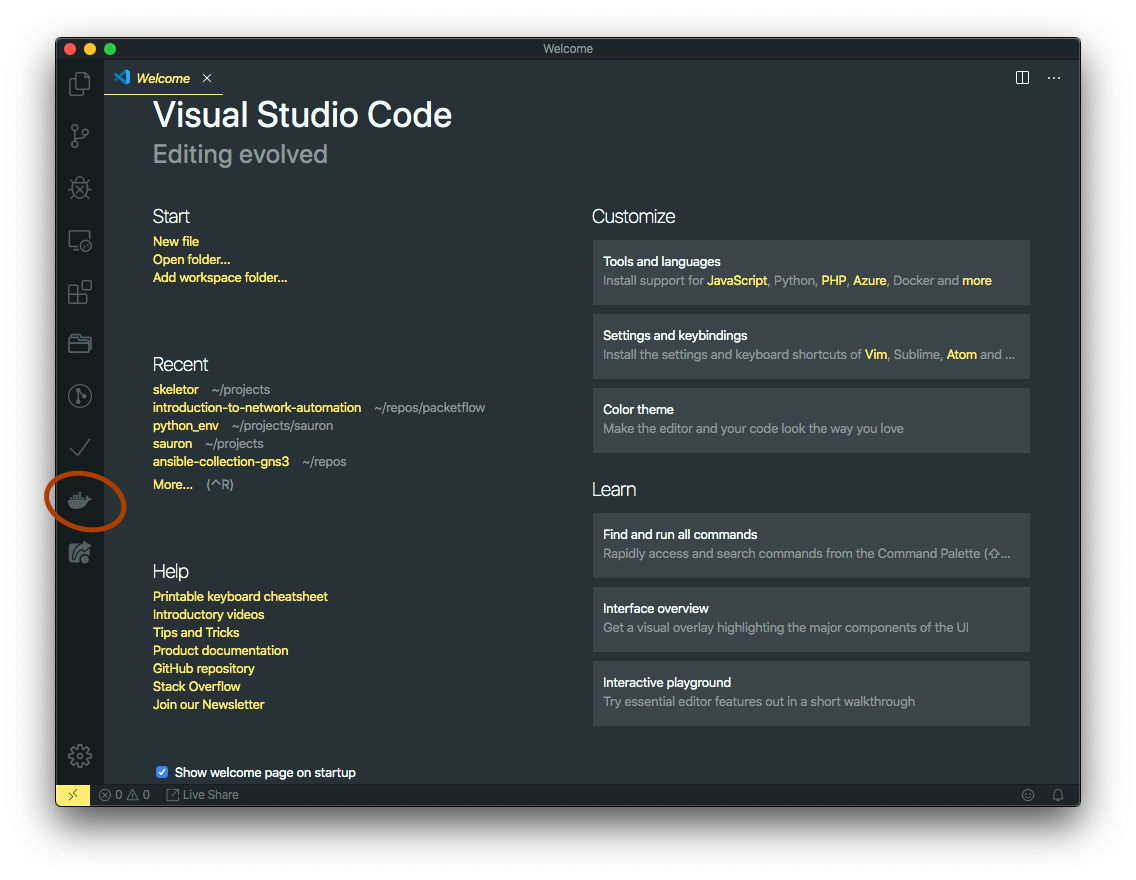
Now you will be presented with a view of the images and containers within your environment.
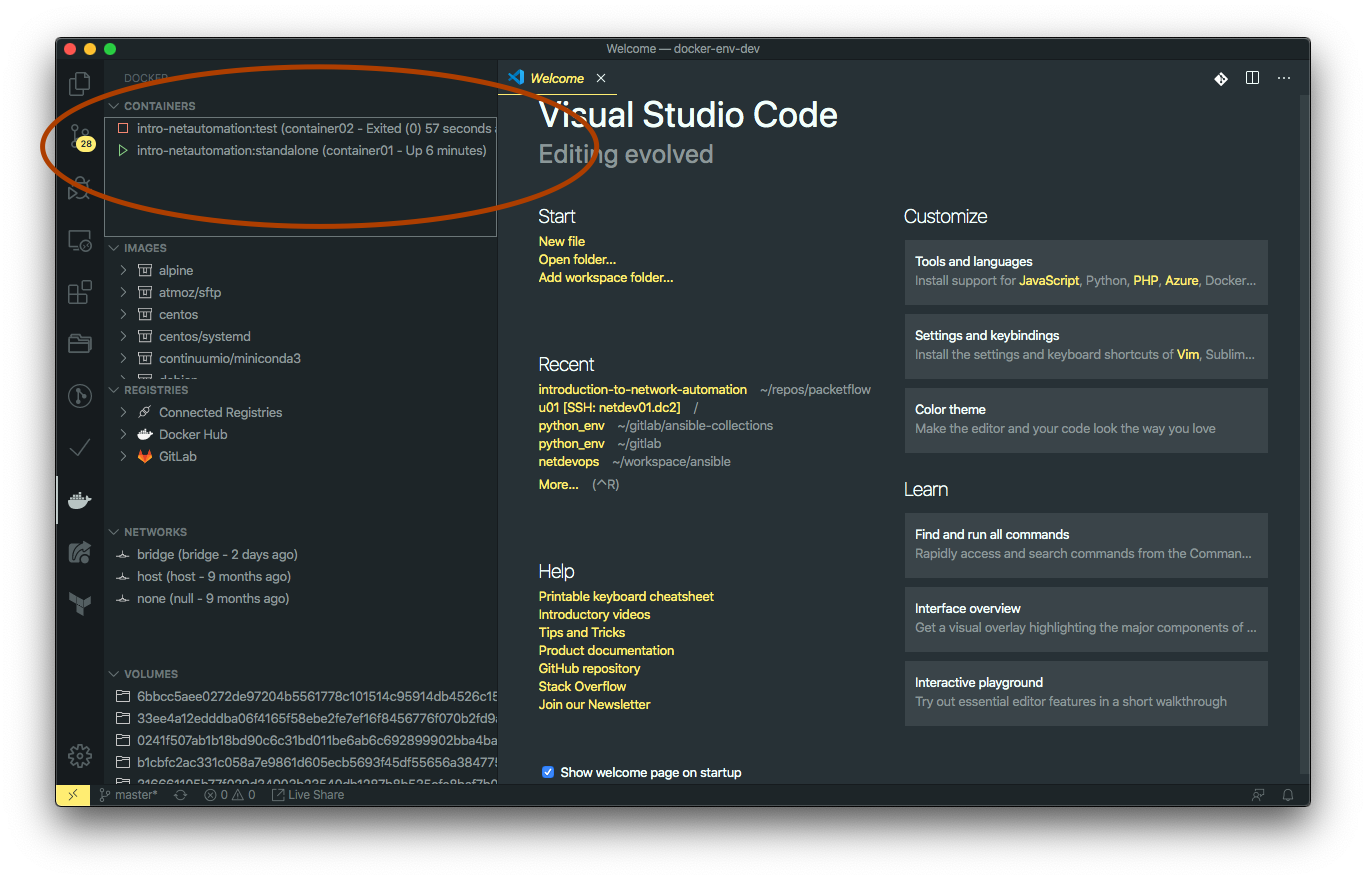
We can see the container01 listed, right-click and select “Attach Visual Code Studio”. This will open a new window, and start the process of syncing the editor and extensions with container01.
You can now open a new terminal, which will open up the shell of the running container.
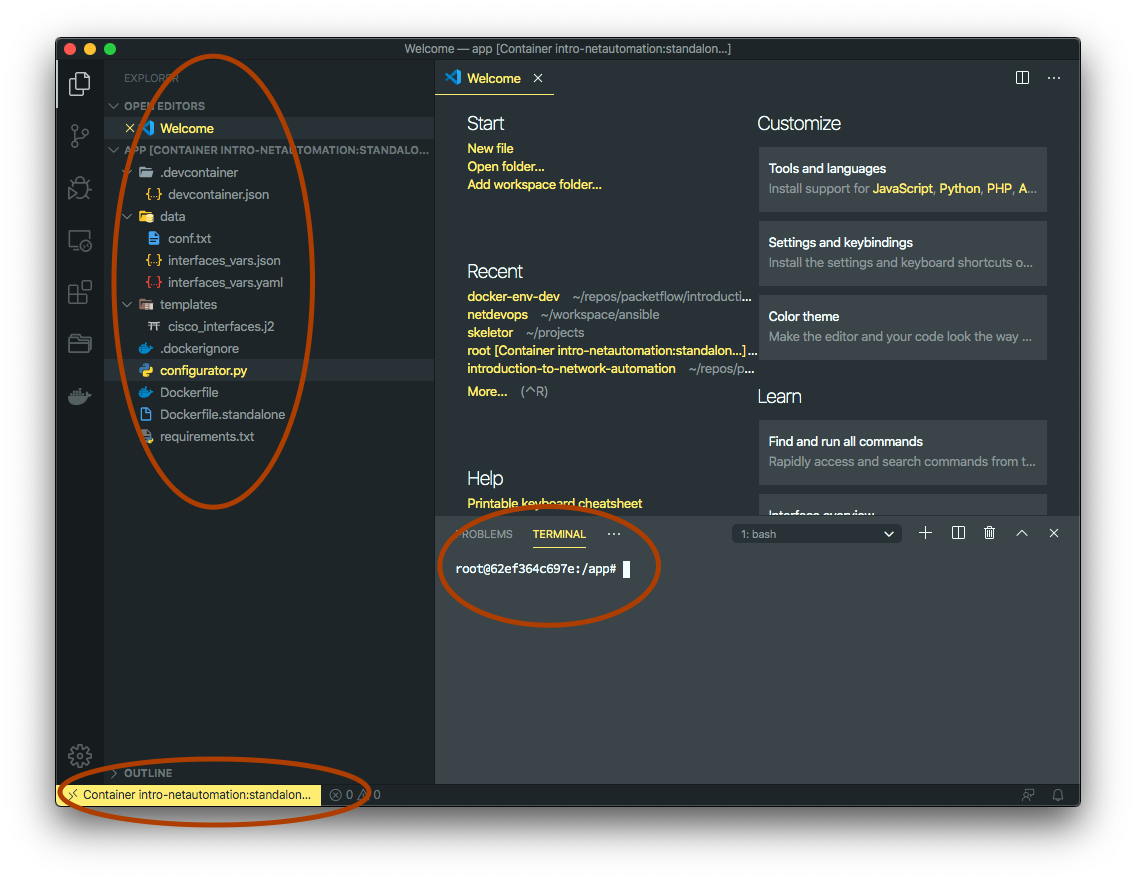
We can see on the bottom left that we are connected to the container. On the right, a terminal window with the container prompt, and at the top left the files that were copied to the container.
Also, you can see the .devcontainer directory. Do not pay attention to that yet, we will review it in the next section.
Let’s try modifying our app by adding a string of Inside container01!! when creating a conf.txt file.

As you can see changes applied are inside the container and thus you have an isolated development environment.
It is important to note the container is ephemeral by nature, meaning that it will destroy any changes on its filesystem if the container is destroyed at a later stage. There are some advantages of doing your development inside a container:
- The development is consistent and in accordance with the target operating system where your application will reside.
- Swapping between different and isolated environments is quick and easy.
- Improves the sharing of a consistent development environment across your team.
- No impact to your local setup.
- When used with the likes of
docker-composeyou can test your app with other dependencies like a database.
Creating Docker Dev Environment with VSCode
While the above method is great for setting up a container to develop and test your code, you can go a step further by switching your entire development environment in a container-based fashion with VS Code. From the “Developing inside a Container using Visual Studio Code Remote Development” page:
A
devcontainer.jsonfile in the project tells VSCode how to access (or create) a development container with a well-defined tool and runtime stack. This container can be used to run an application or to sandbox tools, libraries, or runtimes needed for working with a codebase.
Workspace files are mounted from the local file system or copied or cloned into the container. Extensions are installed and run inside the container, where they have full access to the tools, platform, and file system. This means that you can seamlessly switch your entire development just by connecting to a different container. Boom!
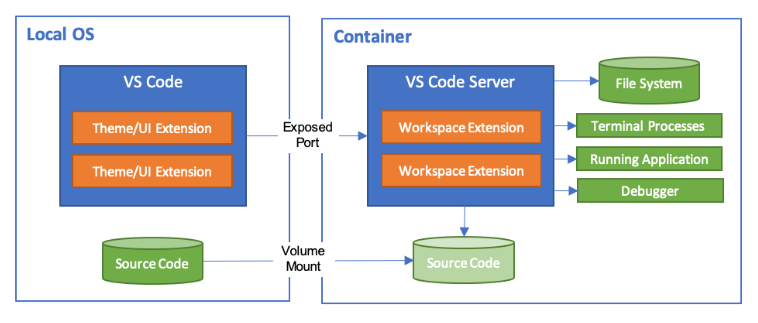
This lets VS Code provide features like IntelliSense (completions), code navigation, and debugging.[1]
By using a .devcontainer we can specify what our development environment and tooling looks like, and even leverage tools like docker-compose or Kubernetes.
Within the - VS Code remote development - documentation multiple approaches are provided on how a development environment can be set up. It depends on the tooling and workflow process you may already have or you want to adopt.
Dockerfile Updates
Continuing with the application intro-netautomation example, let’s use the current Dockerfile to create a dev environment so it is automatically initiated by VS Code.
To achieve this some changes need to happen on the Dockerfile:
- VS Code will now copy the full workspace into the container, therefore we don’t need to copy the data to the
app/folder. - The
RUN pip install -r requirements.txt ...instruction will be moved insidedevcontainer.jsonas apostCreateCommandsince it will need to be executed after VS Code finishes the workspace setup. - The image we will use is
miniconda3, it is a minimal installer for Conda and will install Python 3.
Once complete the Dockerfile will look like:
FROM continuumio/miniconda3

LABEL version=”1.0.0"
LABEL description=“This an example python-based container”
LABEL maintainer=“David Flores <@netpanda>”

CMD [“/bin/bash”]
As a side note, Miniconda is a small, bootstrap version of Anaconda that includes only conda, Python, the packages they depend upon and a small number of useful packages like pip and zlib. A core benefit you will get from conda is the management of virtual environments and the ability to select different Python versions for each.
Now let’s use VS Code process to create a devcontainer folder with the settings needed to create a development docker environment.
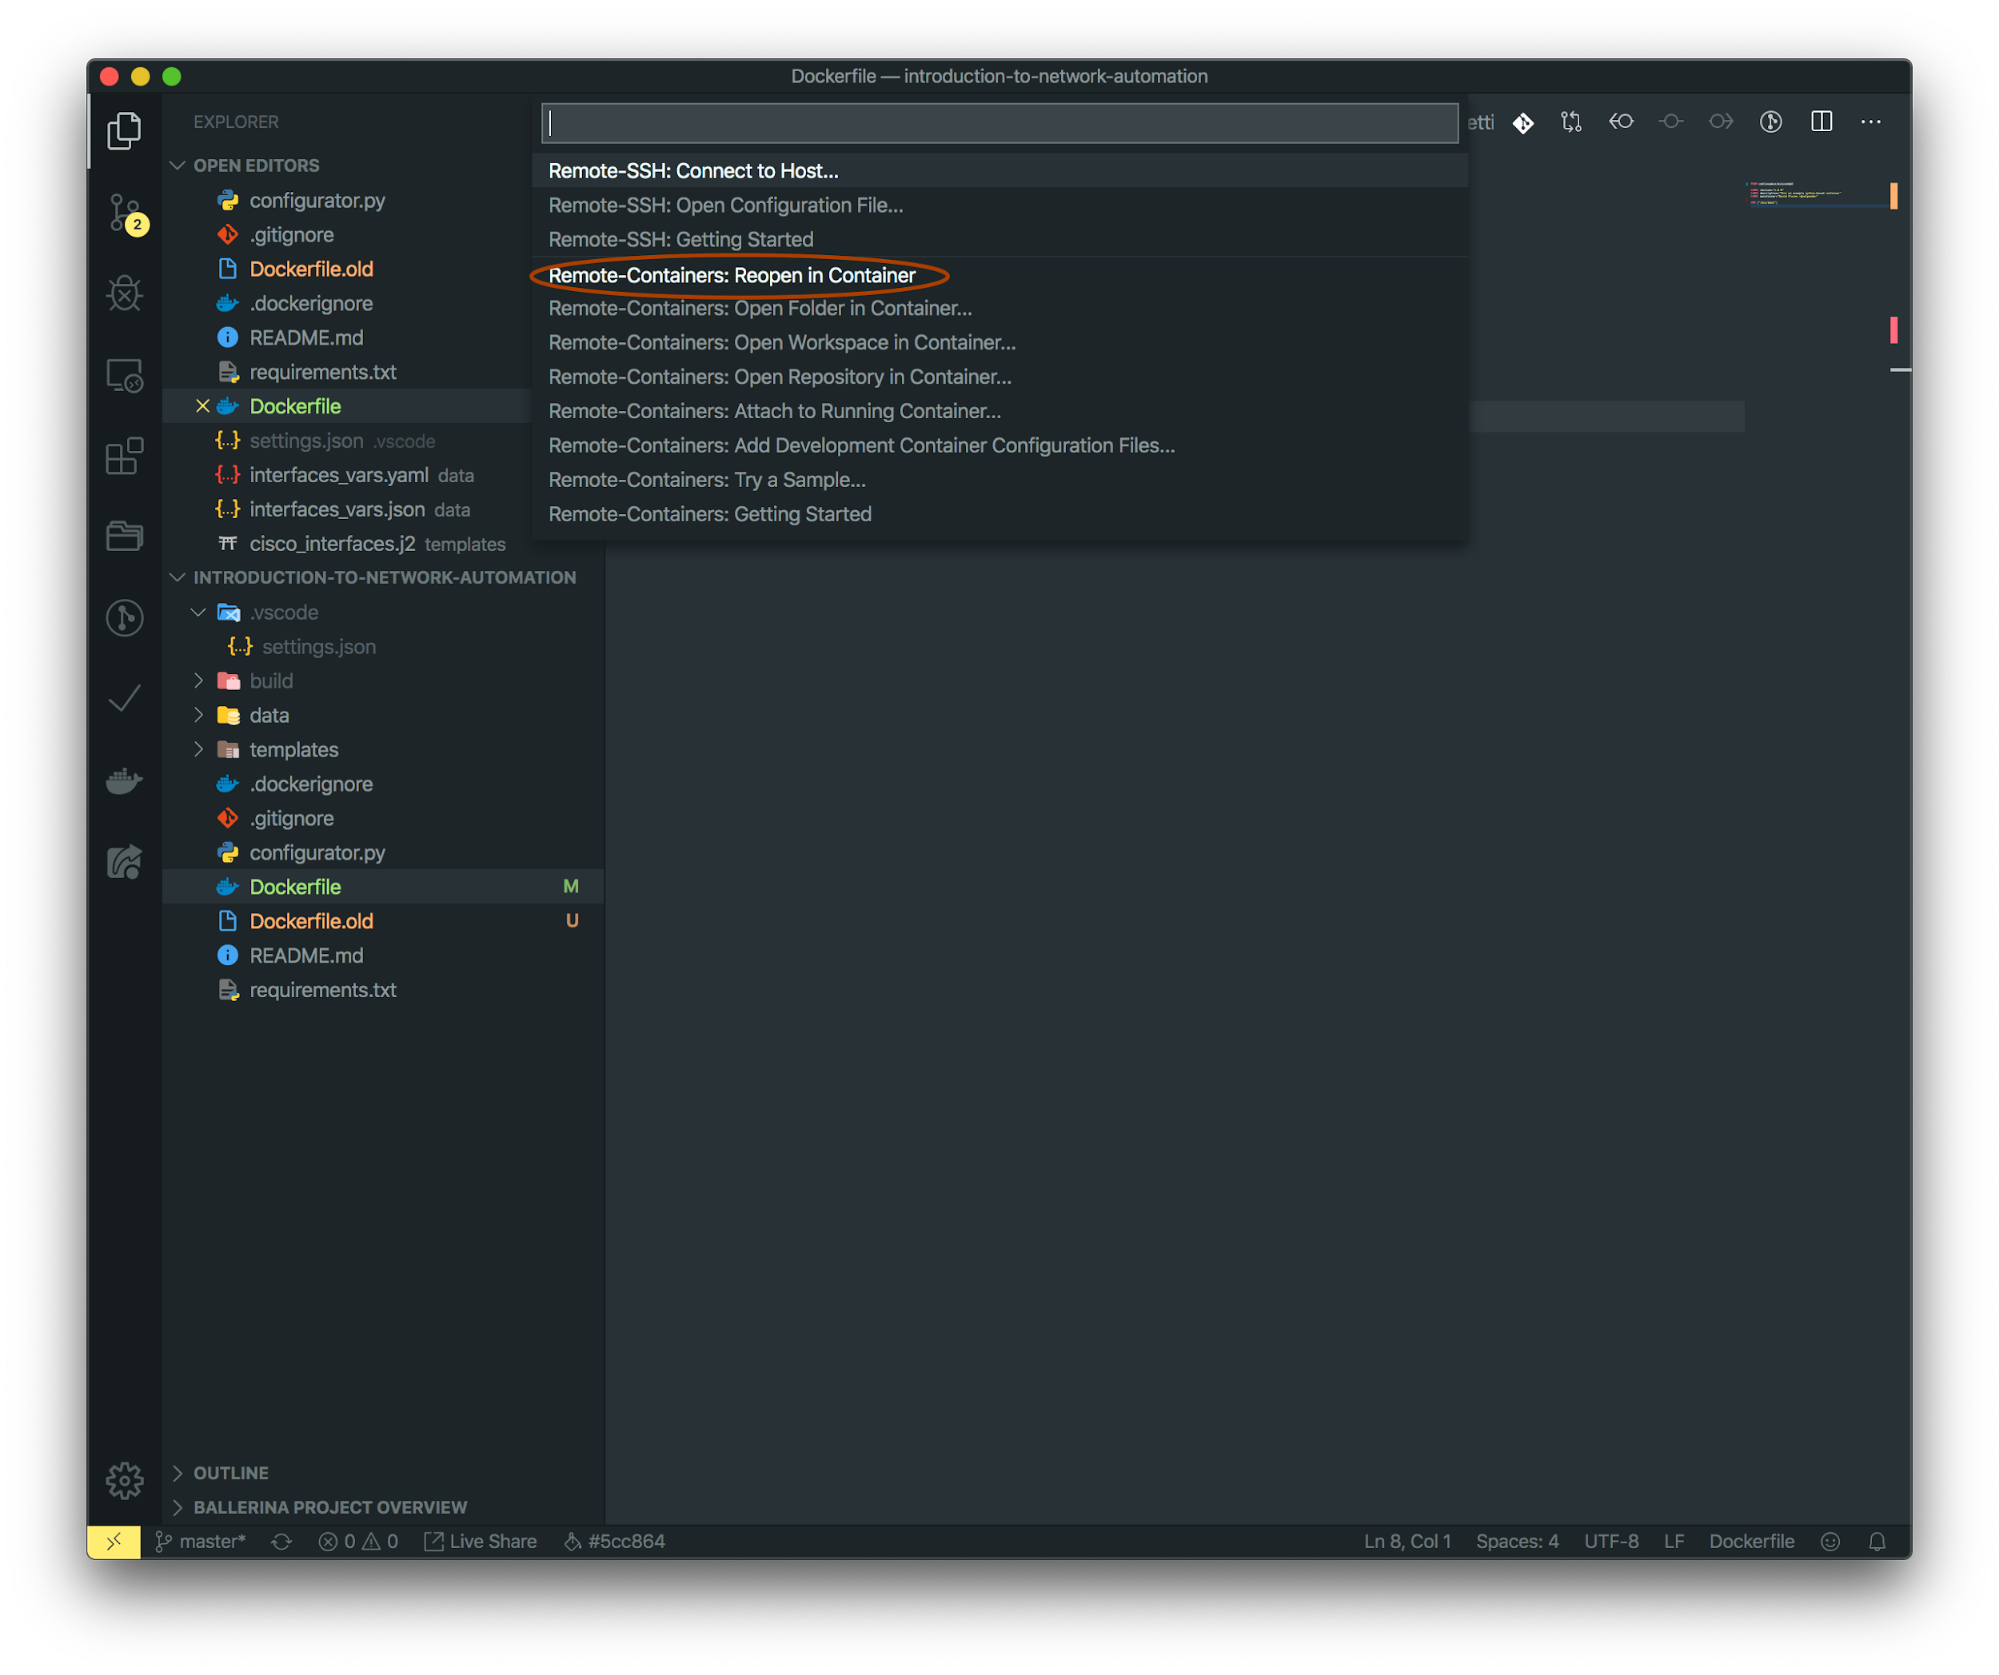
Reopen Project on a Container
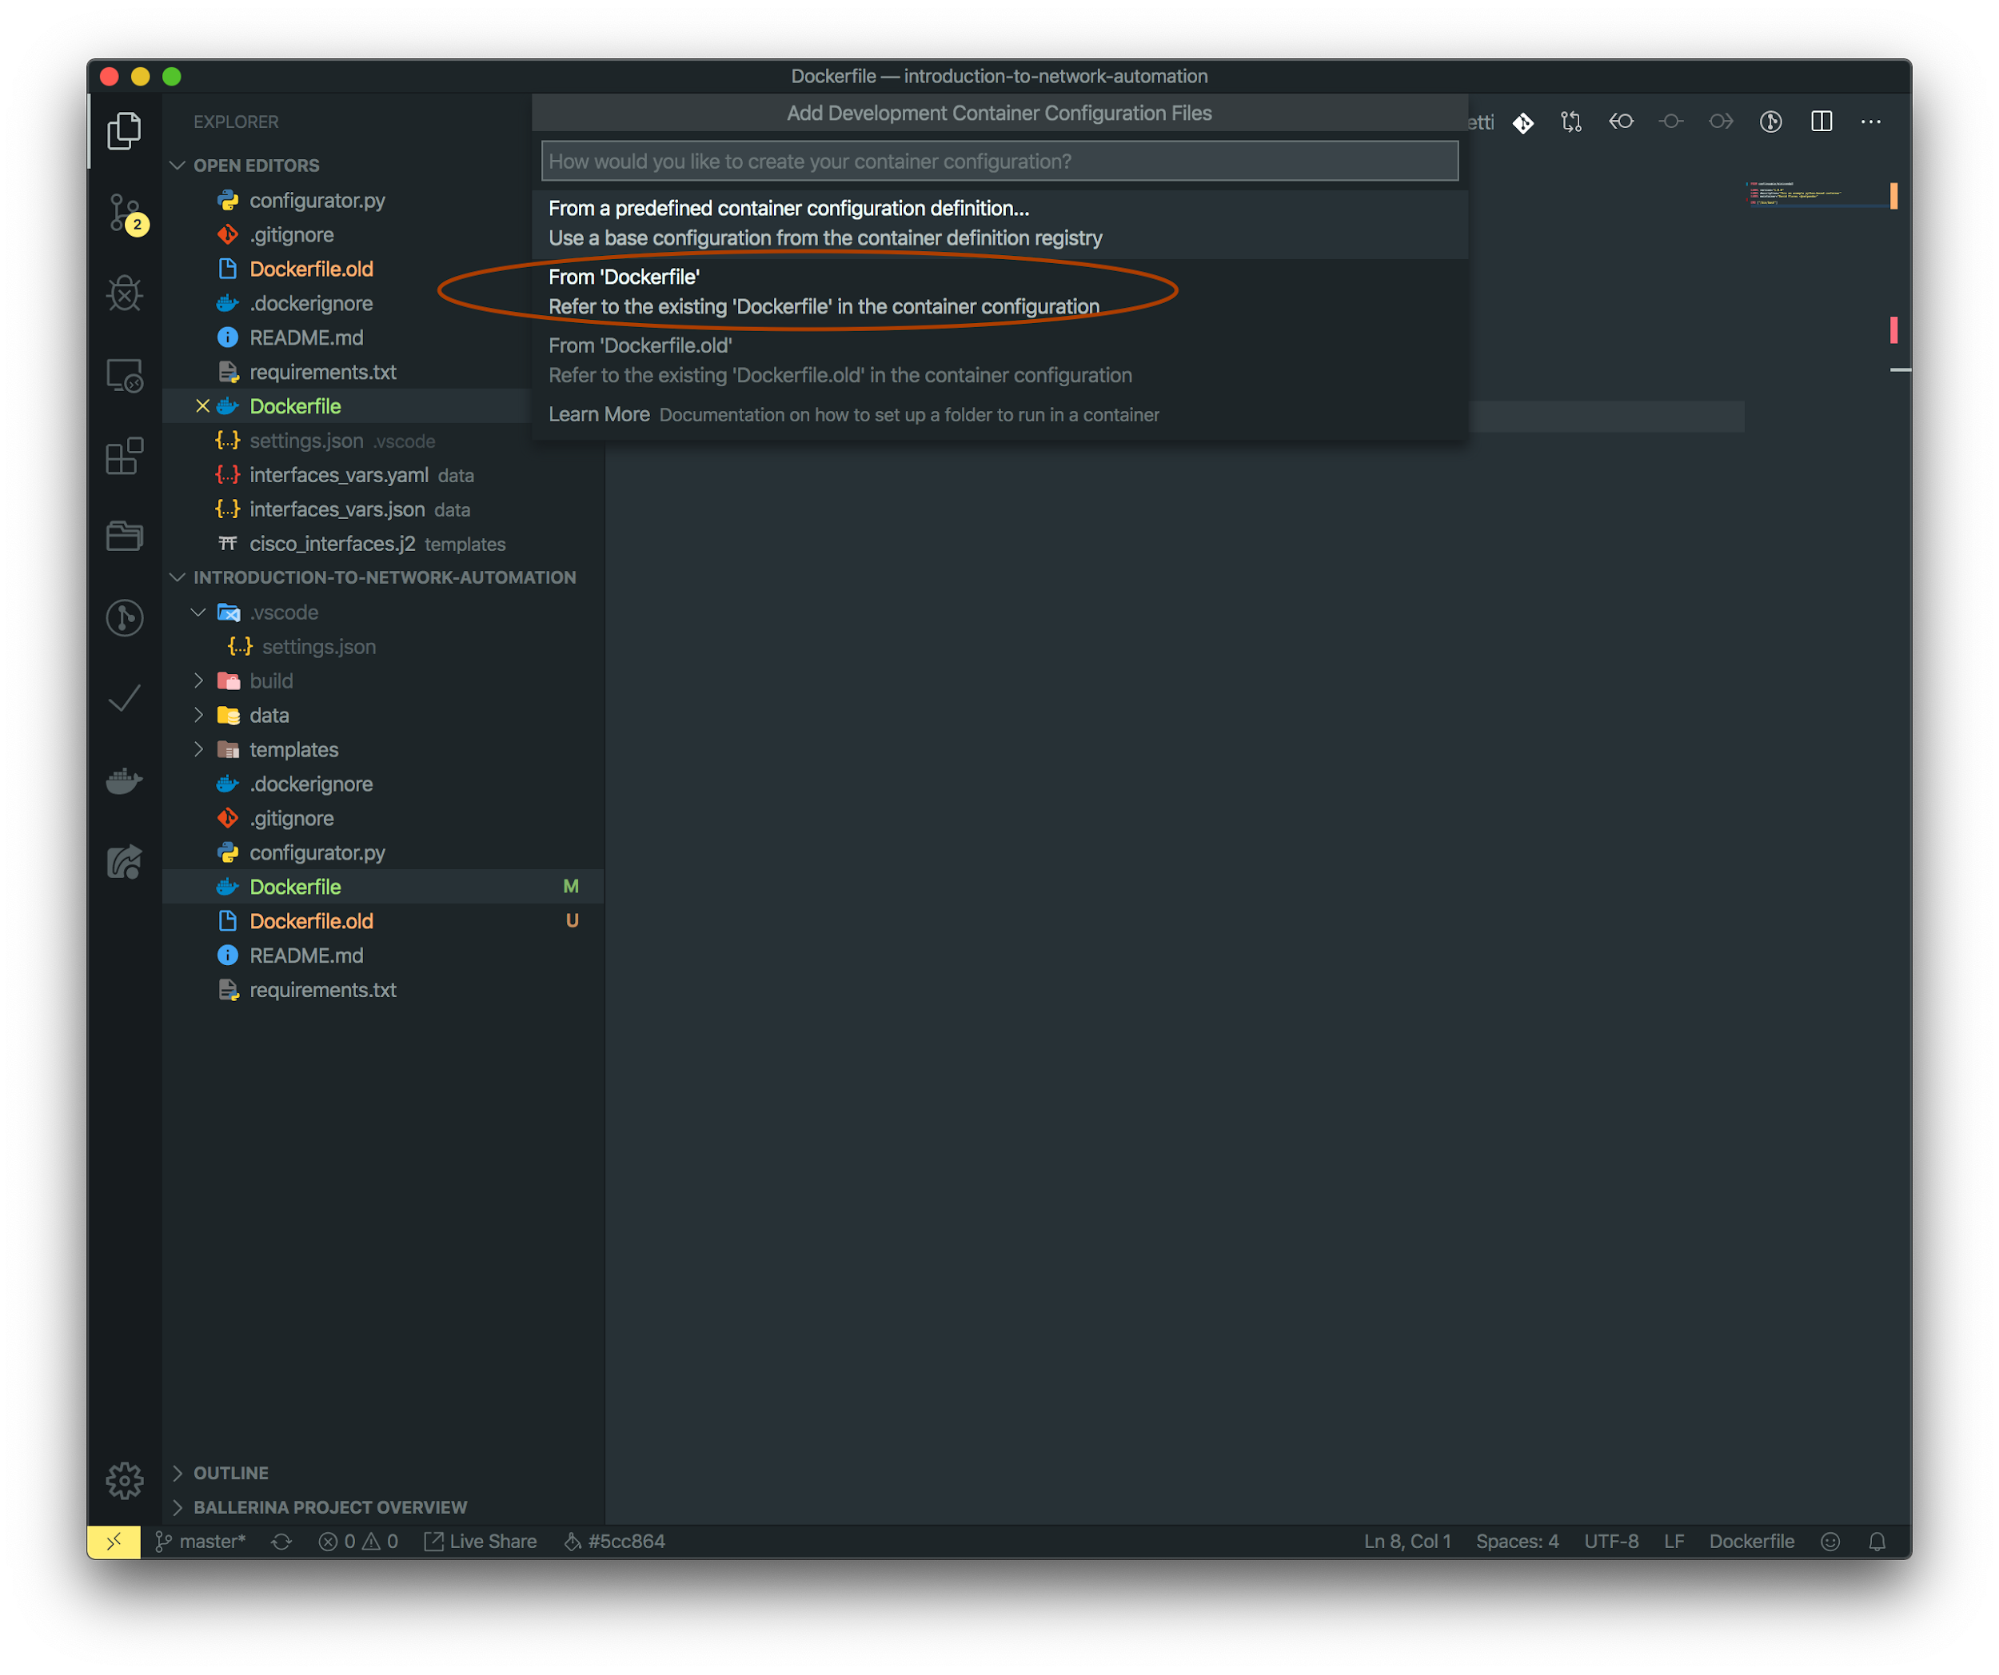
On the VS Code window of the project, you can open the command palette and select the option Remote-Containers: Reopen on a container. This will open another dialog to select how you would want to build your container, from a predefined set or the Dockerfile found in your project. Let’s open with the new Dockerfile.
This will open a new window where you can see the details of the Docker build. It will finish with a message similar to the following.
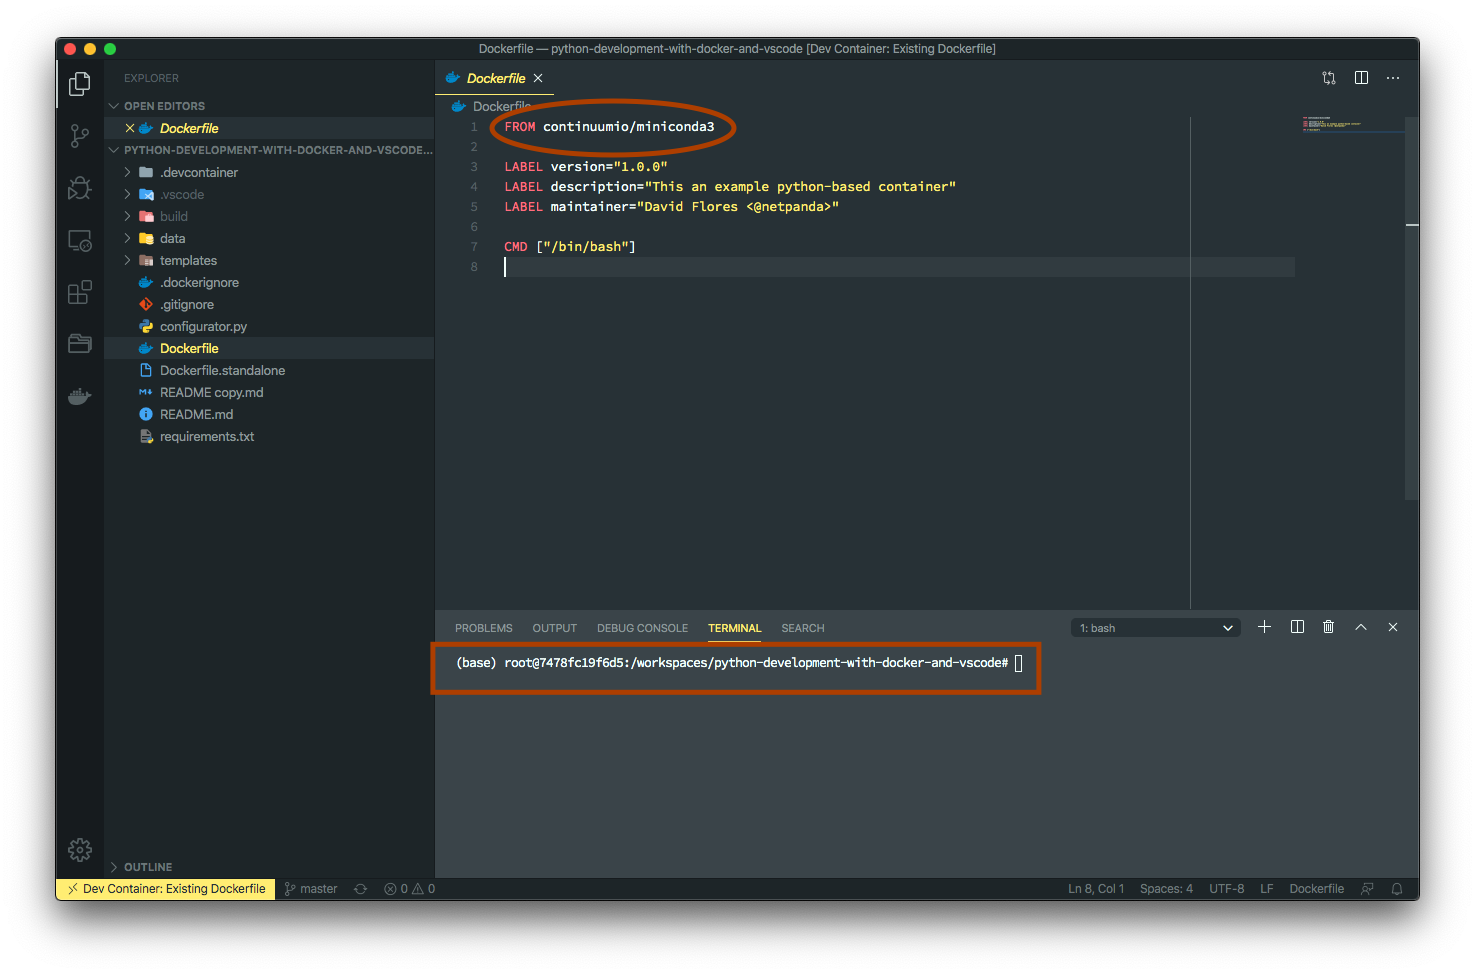
Opening a new terminal and you will be inside a shell session in the container under the project workspace, where we can run commands like pip install -r requirements.txt and mkdir build, but this can be automatically executed when the container is created via adding the requirement statements, such as postCreateCommand to devcontainer.json.
So under the .devcontainer folder, open the devcontainer.json file and modify its contents to:
{
    "name": "Existing Dockerfile",
    "context": "..",
    "dockerFile": "../Dockerfile",
    "settings": {
        "terminal.integrated.shell.linux": null
    },
    "postCreateCommand": "apt-get update && apt-get install -y git && pip install -r requirements.txt && mkdir build/",
    "extensions": []
}
Reopen the folder locally, save the changes, delete and relaunch the container from VS Code (see Managing containers). It will build the new container, install git and the Python requirements.
Now the entire development environment has been switched to a container-based approach. Here are further steps to enhance your workspace:
Switching Python Versions in Conda
At the time of this writing the continuumio/miniconda3 ships with python version 3.7.3. Let’s test the application.
Open VSCode terminal, it should connect you to the container shell and inside the project workspace directory. Like so:
(base) root@4f0e3df6bd5:/workspaces/python-development-with-docker-and-vscode# pwd
/workspaces/python-development-with-docker-and-vscode
(base) root@4f0e3df6bd5:/workspaces/python-development-with-docker-and-vscode# python --version
Python 3.7.3
Let’s run the application.
(base) root@4f0e3df6bd5:/workspaces/python-development-with-docker-and-vscode# python configurator.py data/interfaces_vars.json templates/cisco_interfaces.j2
Created 'build/conf.txt' file!
!
interface Vlan177
  description Lan In-Band Network
  ip address 10.77.1.68 255.255.255.0
  load-interval 5
!
interface Management1
  description lab01 - Eth100/1/37
  ip address 10.17.17.177 255.255.255.0
  load-interval 5
  no shutdown
!
Great. Now let’s try something different, let's create a new virtual environment and switch to Python 3.6 and see if our application is compatible with it.
(base) root@4f0e3df6bd5:/workspaces/python-development-with-docker-and-vscode# conda env list
# conda environments:
#
base                  *  /opt/conda

(base) root@4f0e3df6bd5:/workspaces/python-development-with-docker-and-vscode# conda create -n py36 python=3.6
Collecting package metadata: done
Solving environment: done

...
<Omitted output>
...
#
# To activate this environment, use
#
#     $ conda activate py36
#
# To deactivate an active environment, use
#
#     $ conda deactivate
It will download and install some utility packages and conda dependencies. Now you can activate the new Python environment, check the version and install the project dependencies.
(base) root@4f0e3df6bd5:/workspaces/python-development-with-docker-and-vscode# conda activate py36
(py36) root@4f0e3df6bd5:/workspaces/python-development-with-docker-and-vscode# python --version
Python 3.6.10 :: Anaconda, Inc.
(py36) root@4f0e3df6bd5:/workspaces/python-development-with-docker-and-vscode# which pip
/opt/conda/envs/py36/bin/pip
(py36) root@4f0e3df6bd5:/workspaces/python-development-with-docker-and-vscode# pip install -r requirements.txt
Collecting jinja2
...
<Omitted output>
...
Successfully installed MarkupSafe-1.1.1 jinja2-2.10.3 pyyaml-5.3
The appliance can now be run again against Python 3.6.
Outro
We have seen the benefits of having a development environment running on Docker. Such as:
- Isolated Python installation, with isolated dependencies and even virtual environments.
- Standardized VSCode Docker environments via the
.devcontainer.jsonfile. - Allows you to keep your local environment clean.
- Enables ease and reliability to the sharing and contribution of development environments. A good example is the Nornir project.
Therefore it leaves me to say, that I hope you have enjoyed this article and that it helps you, as much as VSCode/Docker has me when developing.
References
"Developing inside a Container using Visual Studio Code ...." https://code.visualstudio.com/docs/remote/containers. Accessed 27 Jan. 2020. ↩︎