
Introduction
For many of us in network automation, Ansible has been the default tool to use when needing to do "things" against our network devices. But there is a new kid on the block - Nornir. This article will provide you with an introduction to Nornir and dive into Nornirs main features and components.
Let's go...
What is Nornir?
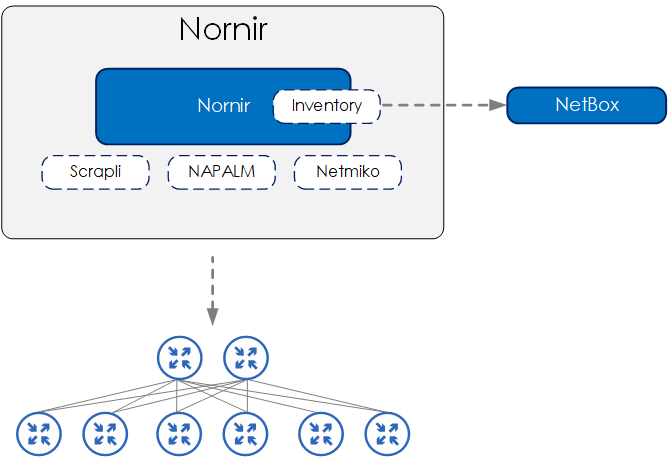
Nornir (from the creator of NAPALM, David Barrasso) is a pluggable multithreaded framework with inventory management to help operate groups of devices. Nornir is 100% Python. Whereas many automation frameworks (such as Ansible) use their own domain-specific language (DSL), Nornir lets you control everything from Python.
This all sounds great, but what does it all mean?
Pluggable
Nornir is pluggable. This means a few things:
- Nornir Core - only the essential functionality of Nornir resides within the Nornir Core. As a result, Nornir is lightweight, lean and therefore extremely stable.
- Plugins - the Nornir ecosystem provides a range of plugins to perform various tasks so that you do not have to burn the cycles on writing the needed boilerplate core. This includes reading YAML files, writing to a file, rendering Jinja2 templates, etc.
Multithreaded
Rather than perform the various tasks in a sequential manner - e.g. perform a task, wait for it to finish and then move on to the next - Nornir (by default) uses multithreading. This allows Nornir to run the tasks across multiple devices concurrently.
Framework
Nornir is a framework, therefore it provides you with a structure in which to build your tasks and Python code. Not only this, but you can also extend the framework and build out your own plugins if you wish to do so.
Inventory Management
Nornir provides inventory management, allowing you to store your inventory details (IPs, platform types, etc) within the Nornir inventory or pulled from an external source such as NetBox. In other words, you define the devices you want to connect to and then Nornir runs the tasks against your inventory. Nornir also provides various features for filtering the inventory so you can choose what tasks are performed against what devices.
100% Python
Nornir is 100% Python, therefore there is no DSL (domain-specific language) abstracting the underlying Python away. You simply write your Nornir code in Python. Because of this:
- Troubleshooting/debugging is easier as you can use existing Python tools such as PDB.
- It helps when needing to perform more complex logic or more advanced features, due to not having to deal with a layer of DSL.
If you are looking to learn more about Nornir, check out the Packet Coders’ on-demand video course below.
 Rick Donato
When Would You Use Nornir?
Nornir is great for building structured tasks for various “things” that you may need to do to your network. Such as:
- creating Nornir tasks to backup your devices - this can be scheduled to run each night.
- creating Nornir tasks to pull data from a YAML file and using this data to render device configuration from a Jinja2 template.
- pushing configuration out to a device using the NAPALM, Scrapli or Netmiko plugins.
You may be saying,
But I can write Python to perform this without needing to use Nornir.
Well yes, yes you could. But here’s the thing: Nornir gives you the framework. It abstracts much of the boilerplate code (via plugins) you would need to perform such tasks, and also provides you with a framework that allows you to build your code/tasks in a structured way.
Nornir Components
Nornir is based upon the following components:
- inventory - the devices that we want to perform our tasks against
- tasks - a Python function that is run on a per-host basis
- functions - a function runs globally. For example, print_result is a function that prints the results of executed tasks.
At a high level, we run our tasks against the devices that are within our inventory. And then we perform an action against our results using a function.
Inventory
Our inventory holds data about the devices that we want to perform our tasks against. This could be device-specific data such as an IP address or platform type, or data that is global across multiple devices such as DNS server IPs.
Inventory Structure
The Nornir inventory structure consists of:
- hosts - individual hosts and any related attributes
- groups - group definitions and any related attributes for a group of devices
- defaults - attributes that are assigned to all hosts regardless of group assignment.
Tasks
A task is a Python function that is run on a per-host basis. We define our task or tasks and then run them against our devices within our inventory.
A simple example is shown below:
Here we are simply taking a number and multiplying it by 10. We then return the result. This task will be run for each host. This is a simplified example - as you can see, we don’t actually perform anything against the device, but we will dive much more into tasks and perform actions against network devices as we go through the course.
# A Nornir function.
def task_1(task: Task, number: int) -> Result:
    n = number * 10
    return Result(host=task.host, result=f"{n}")

# Running a Nornir function.
result = nr.run(name="task_1", task=task_1, number=100)
Functions
The role of a function is to perform an action globally. The common function that you will use within Nornir is print_result which prints the results of your tasks. Below is a short example:
print_result(result)
===
Run task_1**********************************************************************
* spine1-nxos ** changed : False ***********************************************
vvvv Run task_1 ** changed : False vvvvvvvvvvvvvvvvvvvvvvvvvvvvvvvvvvvvvvvvvvvvv INFO
1000
^^^^ END Run task_1 ^^^^^^^^^^^^^^^^^^^^^^^^^^^^^^^^^^^^^^^^^^^^^^^^^^^^^^^^^^^^
* spine2-nxos ** changed : False ***********************************************
...
Nornir Example
Overview
Let’s now run our first task. The task we will run will be based on using the Scrapli plugin to show the LLDP neighbours of our spine devices.
The key point here is showing the folder layout and various “things” within our script that we need to do in our Nornir script in order to run our task.
Install Nornir
To install Nornir, both nornir and nornir-utils need to be installed. Like so:
# Create a new venv directory
$ mkdir venv

# Create a virtual environment
$ python3 -m venv venv/venv-nornir

# Activate the virtual environment
$ source venv/venv-nornir/bin/activate

# Install Nornir
$ pip install nornir
$ pip install nornir-utils
Note: nornir-utils is installed as it provides us with a plugin for reading inventory data from YAML-based files.
Folder Layout
The folder and files for our Nornir project that is needed to run our task are shown below.
We have our config that points to our inventory files. And we have our task within nr_scrapli_get_lldp_neighbors.py.
$ tree ./run_1st_task/
./run_1st_task/
├── config.yaml
├── inventory
│   ├── defaults.yaml
│   ├── groups.yaml
│   └── hosts.yaml
└── nr_scrapli_get_lldp_neighbors.py
Below is a sample of the hosts.yaml
hosts.yml
---
spine1-nxos:
  hostname: spine1.lab.packetcoders.io
  groups:
    - nxos
spine2-nxos:
  hostname: spine2.lab.packetcoders.io
  groups:
    - nxos
...
groups.yml
---
nxos:
  platform: nxos_ssh
  data:
    role: spine
  connection_options:
    scrapli:
      platform: cisco_nxos
...
defaults.yml
—--
connection_options:
  scrapli:
    port: 22
    extras:
      auth_strict_key: False
Code Walk-Through
Let’s now look at our script. The main parts are explained using inline comments within the script below.
The main point here is that we are:
- loading our environment variables from
.envusingload_dotenv() - initializing Nornir against our config file
- setting the username and password that are needed to log into the device using the environment variables previously loaded
- filtering the inventory for only spine-based devices.
At this point, we are ready to run our task. Therefore, we:
- run our task and assign the output to
result - then print the result of our task using the function
print_result.
Please note: You will need to ensure you have python-dotenv installed via pip install python-dotenv``.
#!/usr/bin/env python

import os
import sys
from dotenv import load_dotenv
from nornir import InitNornir
from nornir_scrapli.tasks import send_command
from nornir_utils.plugins.functions import print_result

# Load the environment variables from the .env file.
load_dotenv()

# Nornir config path and filename.
NORNIR_CONFIG_FILE = "config.yaml"

# Initialize Nornir against the supplied config file.
nr = InitNornir(config_file=NORNIR_CONFIG_FILE)

# Pull the device username/password from the environment variables within .env and assign to the inventory defaults.
nr.inventory.defaults.username = os.getenv("DEVICE_USERNAME")
nr.inventory.defaults.password = os.getenv("DEVICE_PASSWORD")

# Filter the inventory for only the spine devices.
nr = nr.filter(role="spine")

# Run a task to send a command to a device using the Scrapli plugin.
result = nr.run(send_command, command="show lldp neighbors")

# Condition to ensure code below will only be performed when this module is run (i.e not imported).
if __name__ == "__main__":
    # Print the results from our executed tasks.
    print_result(result)
If you are looking to learn more about Nornir, check out the Packet Coders’ on-demand video course below.
Rick DonatoRunning Our Task
If we now run our task (shown below), we will see the results of our command from each of our spine devices.
❯ ./nr_scrapli_get_lldp_neighbors.py
send_command********************************************************************
* spine1-nxos ** changed : False ***********************************************
vvvv send_command ** changed : False vvvvvvvvvvvvvvvvvvvvvvvvvvvvvvvvvvvvvvvvvvv INFO
Capability codes:
  (R) Router, (B) Bridge, (T) Telephone, (C) DOCSIS Cable Device
  (W) WLAN Access Point, (P) Repeater, (S) Station, (O) Other
Device ID            Local Intf      Hold-time  Capability  Port ID
leaf1-ios            Eth1/1          120        R           Gi0/0
leaf2-ios            Eth1/2          120        R           Gi0/0
leaf3-qfx            Eth1/3          120        BR          521
leaf4-qfx            Eth1/4          120        BR          521
leaf5-eos            Eth1/5          120        BR          Ethernet1
leaf6-eos            Eth1/6          120        BR          Ethernet1
Total entries displayed: 6
^^^^ END send_command ^^^^^^^^^^^^^^^^^^^^^^^^^^^^^^^^^^^^^^^^^^^^^^^^^^^^^^^^^^
* spine2-nxos ** changed : False ***********************************************
vvvv send_command ** changed : False vvvvvvvvvvvvvvvvvvvvvvvvvvvvvvvvvvvvvvvvvvv INFO
Capability codes:
  (R) Router, (B) Bridge, (T) Telephone, (C) DOCSIS Cable Device
  (W) WLAN Access Point, (P) Repeater, (S) Station, (O) Other
Device ID            Local Intf      Hold-time  Capability  Port ID
leaf1-ios            Eth1/1          120        R           Gi0/1
leaf2-ios            Eth1/2          120        R           Gi0/1
leaf3-qfx            Eth1/3          120        BR          522
leaf4-qfx            Eth1/4          120        BR          522
leaf5-eos            Eth1/5          120        BR          Ethernet2
leaf6-eos            Eth1/6          120        BR          Ethernet2
Total entries displayed: 6
^^^^ END send_command ^^^^^^^^^^^^^^^^^^^^^^^^^^^^^^^^^^^^^^^^^^^^^^^^^^^^^^^^^^
Outro
Thanks for reading. I hope you`ve enjoyed this Nornir 101 and found it useful. What I have shown you here is just the tip of the iceberg. Some other examples of what you could use Nornir for are:
- backing up device configuration by using the NAPALM plugin
- rendering configuration via Jinja2 templates using the Jinja2 plugins
- pushing out configuration to your devices via the Netmiko or Scrapli plugins.